I am back with the second part of the quilling tutorial blog. We will cover the remaining four techniques today viz. banding & Malaysian quilling, combing, husking and 3-dimensional quilling.
I hope you could make your own slotted tool and get started with the basics. If you did so, try and do share in the comments below. Being able to reach out and help others create beautiful things is what this blog is all about after all.
So let's cover the remaining techniques today. I have added videos for each of them too. In the end I have done a small project involving all the techniques we learnt in these two weeks. This will give you an idea as to how you can use the various techniques in your work.
Advanced quilling techniques
Banding & Malaysian Quilling
Banding: as the term goes, it involves wrapping the strips around the pattern, usually with a different colour. Banding gives a different or same coloured layer to a design, making it more pronounced in appearance.
Malaysian Quilling: This is nothing but an extension of the coiling technique. Initially a loose coil is required which is then folded into a petal shaped structure as shown in the picture above on the right side. Generally Malaysian quilling uses layers of colours and is followed by banding.
Watch the video below for banding and Malaysian quilling.
Combing Technique
This technique uses a comb. We do get quilling combs online or at the craft supply store but using the comb lying at home is perfectly fine too. This generally involves weaving the paper strips around the comb teeth in various patterns. I have exhibited three different techniques using this method in the video below.
Husking Technique
Husking again is a weaving type of technique. It is different from the combing method. A combing pattern will depend upon the distance between the comb tooth for its design. With husking we can create our own pattern. We get husking templates but you can always create your own template. In the video below I have used a page from my square pad as the template. Draw your design on the template using the square markings as the guide to keep the weaving symmetrical. Fix the pins and begin weaving from down to top, starting from the centre.
3-dimensional technique
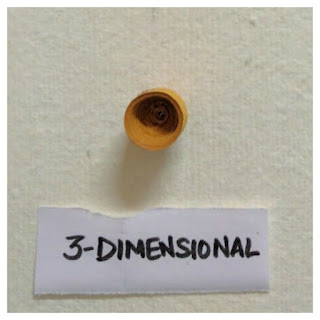
This technique, uses the tight coil as its first step. The coil is further pushed out to form a 3D pattern. Pins, pens or other such objects lying at home can be used to push out the coil. If you do fall in love with quilling (just like I have) and tend to do a lot of projects, I would recommend getting your own 3D quilling mould scales. This is a pretty easy technique, just be careful while pushing out the coil so as to avoid spoiling it. After you get your desired 3D figure, coat the inside and outside with glue and let it dry. This ensures that the pattern does not come undone while assembling the project.
Here is a small quilling project. I have tried to use all the techniques explained above and in the previous post, for this card.
Going clock-wise from top left : Coiling method, 3D and beehive techniques have been used to create a flower. In the next picture, pink petals have been made using coiling and banding technique. I have used two shades of pink for this flower. Next is the bumblebee. The body has been done in yellow 3D and the head in black. The blue wings have been weaved on a comb and the antennas have been coiled and left loose. Next up are the husked sunflowers. For leaves I have taken various shades of green with yellow. Leaves have been quilled Malaysian style and banded with a dark green strip. The last are the buds which have red 3D quills and green ones for the stem.
Husked Sunflower Petals
Different pieces assembled as flowers below.
Assembling the pieces above on a card.
Quilled Card is ready :)
After this I am sure anybody can quill :)
Happy quilling guys.


No comments:
Post a Comment