Thursday, 29 September 2016

Food Art


Art is omni-present.

Sometime back, on the occasion of Ganesha Chaturthi (an Indian festival) I got the opportunity to exhibit art through the medium of food. I am sharing it today. Its one of those simple DIYs.


Ganpati Bappa Morya


Food is an integral part of our lives. Its our eyes that feasts on food foremost. Use these ideas and make your food a visual treat for family and guests. Use todays DIY and create your own food art.
I used tomato, onion, carrots, lemon, green chilly, beetroot, radish , cucumber, whole black pepper, cherries, mint sprigs, orange, some tooth picks. A lot of other fruits and vegetables can be used too. A simple tomato peel flower alone can be a head turner.
Wash and dry all your vegetables and fruits well. Start by planning as per the size of the presenting dish. Keeping your design in mind, roughly estimate how many flowers and leaves would be needed. Keep your flowers, leaves and other decorative bits ready before you begin to assemble.


  Ganesha figure
This DIY has a centre piece, so I began from there. Ganesha's ears, snout and legs were carved out of a carrot and pinned onto a tomato with tooth picks (don't get fixed with getting the perfect shapes, just have some fun). Lemon wedges made the crown, whole black pepper made the eyes and two twisted chillies, the tusks.

  Fruit Flowers

Next up were my flowers. To have some variety I made flowers with tomato peels, cucumber and onions. I am attaching some links to videos from where I took guidance for these flowers. They are really easy and quick to make, so don't get all worked up ;) 


Flowers and leaves go together. Leaves were done with cucumber, radish and carrots. All of them were cut diagonally into thin slices, then carved on the edges and in the middle for the veins.


Carrot leaves

To add a bit of color and detailing, I shredded some beetroot and inserted a sprig of mint leaves in the cherry top. Once you pull out the cherry stem you can insert the mint sprig easily, go a bit gentle with these leaves.


Foodart

The last bit was assembling. I wanted some height for the Ganesha piece so I used a whole orange right in the centre of the dish. The shredded turnip strips helped to cover the orange and I installed the Ganesha figure on top of that. Towards the edge of the circular dish the leaves were placed in alternating colors. An offering of flowers for the lord is just the right thing. And surely he was surrounded by a wide variety of flowers. The tomato roses and onion flowers were placed between the Ganesha figure and the leaves also hiding any blank spaces between the two layers. The cucumber tulips were pinned to the side of the figure with cherry in the centre.

Try it and give it your creative flair and let me know :)


Thursday, 22 September 2016

About to throw out those empty beer bottles? Don't.


Have you been throwing away all those empty glass bottles? Save them for today's DIY and create your own flower holder/ bottle lamp. Wash them, dry them and have some fun while being creative.


Recycled Miller bottle


I used this Miller beer bottle collecting dust at home.
Bottles can be re-used in myriad ways. I'll try and cover such different DIYs in the future.

The one we are doing today is a quick one, 2-3 hours tops.


What you will need


Supplies :

  • Glass bottle
  • Paper rope/rope/yarn
  • Decorative flowers
  • Ribbon (I used a 1/2'' gold one)
  • wire (used in flower making)
  • green beads
  • glue


How to begin


Choose the kind of rope/yarn you would like to wrap around the bottle. Begin from the bottom. Rest the bottle on a folded kitchen towel to let it from slipping. Apply the glue and start to stick the rope by turning the bottle. Make sure to push the rope towards the bottom after every circle to avoid spaces between each loop. Change color if you wish (I did in this case). Keep going until you reach the top most part. Secure the end of the rope well.


try and keep the coils tight finished look


Just a handy tip, use a fat based adhesive (Fevicol in case of Indian markets) if you happen to be a beginner. Since you need to be quite quick while using a hot glue gun as the glue would dry pretty quickly. The only downside in case of the fat based glue would be the drying time. Approximately 6-8 hours.


The fun bit  


And it's ready


Now comes the fun part- decorating the bottle. As I mentioned earlier, sky is your limit. I had some flowers at home complementing my rope color. You can make your own flowers too. I have added this short video for the folded ribbon flowers I made just to fill in the spaces between the bigger ones. If you have some extra time, follow the video and create your own flowers too.


Leaf strings


To add a bit of color or to give that leafy effect, make these green beaded wire strings. They twist and turn the way you want and give that nice 3d effect.


Once all your decoration pieces are ready, go ahead and assemble them.


Bottle lamp


If you wish to use it as a bottle lamp just stick in some led light strip. It can also make a beautiful handmade gift for friends.

Don't throw away those bottles anymore. Recycle them. Go green   :)

Thursday, 15 September 2016

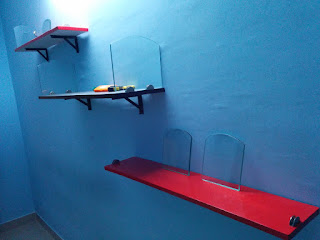
Home-made book shelf

Have you ever thought of building your own wall shelves? Yes, its quite possible and fun to do. All you would need is some time, probably a long weekend, some skills with the drill machine and a visit to the local hardware and glass store.

Home-made Book shelf
Home-made book shelf


Supplies :
1. Ply (0.75'' thick)
2. Sandpaper (D-150/grit 150)
3. Acrylic putty
4. Wood primer
5. Enamel Paint
6. Turpentine Oil
7. Glass shelf clips
8. Glass panels
9. Iron angles
10. Screws, brush & drill machine


To begin the project first get the ply and glass panels cut to size and the glass edges nicely polished.
I have used two 35'' by 7.5'' and one 35'' by 9.5'' ply. Also the glass panel size is 7'' by 6.5'' (4 pieces) and 8'' by 9'' (2 pieces). The glass panel edges have been cut to a dome shape.

This DIY took 3 days for me.

Day 1

To get the ply ready, apply the acrylic putty on both sides and all edges on all three pieces of the board. Make sure to cover the floor with lots of newspaper and wear gloves (its going to get messy). I used Acrylic putty which is ready to use; in case you use dry powder putty mix it with water and get the right consistency (generally 2 parts putty with 1 part water). Apply using a putty plate/blade (easily available in Indian hardware stores).

Apply two coats of putty on each board. Let the first coat dry for 2-3 hours before the second application.

Putty coating

In between the two coats of putty, you can get your angles and screws ready by applying enamel paint (I have used black enamel). Enamel paints tend to take a day to dry (longer in humid weather).
After the second coat of putty is dry, use sand paper (fine sand paper with grit 150) to level the putty surface and make it smooth.

painted angles

Last step for this day would be applying one coat of wood primer (mix turpentine with primer to thin it out-approx 10% turpentine) all around the boards and leave them to dry overnight. This primer helps in better adhesion of the paint to the board.


wood primer application


Day 2

The boards should be nice and dry by now, paint them as you would like (I did 2 red boards and 1 black). Use your imagination. If it is for a kid's room, you could paint cartoons or baby patterns.

I have used enamel to get that glossy look. Matte finish could work wonders too.

final enamel coat


Now here is the waiting bit: enamel will take time drying, a minimum of 24 hours. I was lucky as it was an extremely warm day; in case it is humid, wait for your boards to dry completely else you might end up getting that beautiful glossy finish marred. Patience is the key!


Day 3

Everything is beautiful and ready so what are we waiting for? Get ready with those drills, its time for the final set-up.You might need an extra pair of hands for holding the boards.

Get your boards ready. First screw the glass clips on either side of the board (approx 1'' from the edge). For the larger panel I have used two clips on each side of the board to make it sturdier. Drill holes on the underside of the boards and fasten the angles with screws, equidistant from the edges of the board. Based on the layout you had planned for the shelves, make marks on the wall for the other leg of the angle. Drill holes and fix the boards screwing the angles tightly to the wall (as you can see, I did mine in a 3 step sort of pattern, and I kept them equidistant).


Fixing Angle and glass clips


Next we need to fix the glass panels. Place your panels in the already hooked (horizontal) clips and make markings for the clip that needs to go on the wall. Drill holes and screw those vertical clips to the wall. Slide in the panel and tighten the screws.


Final fitting


Its all up there. Place books, trophies, frames or whatever you like.
These shelves are sure to catch the attention of your visitors and earn praise for your handiwork.


Thursday, 8 September 2016

Old cards and a beautiful wall

Hi all,

When going about decorating your rented home, most of us don't want to spend or buy a lot for obvious reasons.  Well, this DIY is for one such occasion. Use whats lying around with practically zero expense and make your home pretty.


final wall hanging of cards

What you would need :
1. Handmade greeting cards/old photos etc
2. String or decorative paper strips
3. Tiny decorative flowers (cutouts work just fine)
4. Glue
5. Scissors
     stuff that you need

I used four of my hand-made greeting cards for this wall hanging. You can use anything from printed greetings to old photos or any such memorabilia. Estimate the total length of the hanging as per your wall area. Then, place the cards on your working surface equidistantly such that the total length is your required length.


cards placed equidistantly

I used 6'' long brown glitter strips to join these cards as shown in the picture below (colored strings, yarn can be used too). I had some pretty glitter flower cutouts lying at home that just went along for a bit more beautification, as are visible in the image below. Any cutout, flowers, beads and many other decor items can be used. Based on the wall color or room theme, if any, the string/strips and cutouts can be altered; be crafty and give wings to your imagination.

colored glitter strips and cutouts

Finally, for the hanging bit, I used the same glitter strips (string, wire can be used too). As you can see in the image below, the glitter strip has been wrapped around a 12'' long strip with lots of glue. The dried glue and the double strips make the string quite stiff and strong. To this 12'' strand I pasted one of the 6'' strips on either side which was further stuck beneath the first card.

   double string coiling   

Let the whole thing dry for 6-8 hours and it is ready :)
Your precious memories on your wall in a beautiful way...try it!!